[PySpark] 決策樹範例
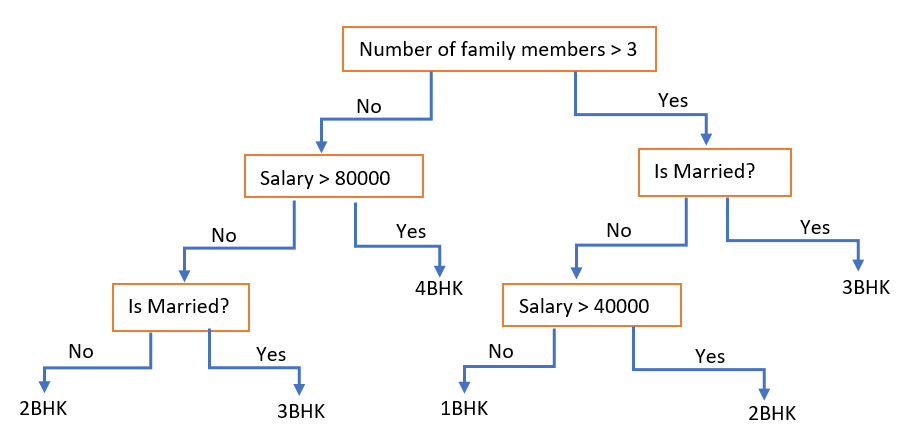
在安裝完 Jupyter Notebook 到自己的 Server 之後我們就可以在遠端執行機器學習的程式了!參考連結。在眾多機器學習的演算法中,最直覺的演算法就屬決策樹 (Decision Tree) 了,本篇教學是以 Spark 範例中呈現的 Python 程式碼為主要示範內容,並且利用 Jupyter Notebook 作為執行載具。
from pyspark.mllib.tree import DecisionTree, DecisionTreeModel
from pyspark.mllib.util import MLUtils

data = MLUtils.loadLibSVMFile(sc, 'data/mllib/sample_libsvm_data.txt')
(trainingData, testData) = data.randomSplit([0.7, 0.3])

model = DecisionTree.trainClassifier(trainingData, numClasses=2, categoricalFeaturesInfo={},
    impurity='gini', maxDepth=5, maxBins=32)

predictions = model.predict(testData.map(lambda x: x.features))
labelsAndPredictions = testData.map(lambda lp: lp.label).zip(predictions)
testErr = labelsAndPredictions.filter(
    lambda lp: lp[0] != lp[1]).count() / float(testData.count())
print('Test Error = ' + str(testErr))
print('Learned classification tree model:')
print(model.toDebugString())

model.save(sc, "target/tmp/myDecisionTreeClassificationModel")
sameModel = DecisionTreeModel.load(sc, "target/tmp/myDecisionTreeClassificationModel")
在開始執行程式之前,要先確認遠端的 Jupyter Notebook 環境是否已經安裝 pyspark 函式庫?如果沒有安裝會報錯,否則可以利用以下的 pip 指令進行安裝。
pip search pyspark
pip install pyspark==2.3.2

Collecting pyspark==2.3.2
  Downloading https://files.pythonhosted.org/packages/5e/cb/d8ff49ba885e2c88b8cf2967edd84235ffa9ac301bffef657dfa5605a112/pyspark-2.3.2.tar.gz (211.9MB)
     |████████████████████████████████| 211.9MB 83kB/s
Requirement already satisfied: py4j==0.10.7 in /usr/local/lib/python3.6/site-packages (from pyspark==2.3.2) (0.10.7)
Building wheels for collected packages: pyspark
  Building wheel for pyspark (setup.py) ... done
  Created wheel for pyspark: filename=pyspark-2.3.2-py2.py3-none-any.whl size=212344373 sha256=2eaf954ffab67bfdb211ab5cd336661b6b7d05638c7a38f212ec7f4ff82c447b
  Stored in directory: /root/.cache/pip/wheels/be/7d/34/cd3cfbc75d8b6b6ae0658e5425348560b86d187fe3e53832cc
Successfully built pyspark
Installing collected packages: pyspark
Successfully installed pyspark-2.3.2
備註:這邊需要注意一下,安裝的 pyspark 版本必須要是跟 $SPARK_HOME 的 spark 版本數一致,否則在初始化 SparkContext 跟 SparkSession 的時候會一直報以下的錯誤訊息。
py4j.protocol.Py4JError: org.apache.spark.api.python.PythonUtils.getEncryptionEnabled does not exist in the JVM發現一開始的 sc 並沒有正確被初始化,一般初始化 SparkContext 的方法有以下幾種:
- 直接從 pyspark 裡面載入 SparkContext
from pyspark import SparkContext
sc = SparkContext()- 利用 findspark
import findspark
findspark.init('/opt/spark-2.3.2-bin-hadoop2.7')
findspark.find()
sc = pyspark.SparkContext(appName="DecisionTree")
接下來則是載入資料,這邊官網上建議可以使用 Libsvm 提供的參考數據,我們拿第一個資料作為範例 https://www.csie.ntu.edu.tw/~cjlin/libsvmtools/datasets/binary/a1a 並且展示第一個資料利用 LabeledPoint 呈現:
data = MLUtils.loadLibSVMFile(sc, '/home/yuting/.jupyter/MachineLearning/a1a')
data.first()

LabeledPoint(-1.0, (119,[2,10,13,18,38,41,54,63,66,72,74,75,79,82],[1.0,1.0,1.0,1.0,1.0,1.0,1.0,1.0,1.0,1.0,1.0,1.0,1.0,1.0]))
由於 Libsvm 提供的資料為 (1, -1) 作為 Label 與 mllib DecisionTree 的模型設定不同所以需要先經過一個正規劃的過程。從結果我們可以看到 LabeledPoint 的 -1 Label 已經被改成 0 了!
from pyspark.mllib.regression import LabeledPoint
def normalize(point):
    label = point.label
    if label == 1:
        return point
    else:
        return LabeledPoint(0, point.features)

data.count()
dataNormalized = data.map(lambda s: normalize(s))
dataNormalized.first()

LabeledPoint(0.0, (119,[2,10,13,18,38,41,54,63,66,72,74,75,79,82],[1.0,1.0,1.0,1.0,1.0,1.0,1.0,1.0,1.0,1.0,1.0,1.0,1.0,1.0]))
將資料分成 70% Training 與 30% Testing,並且設定 DecisionTree 分辨器利用以下的參數:
- numClasses=2
代表這是一個 Classification 的問題,預測值為 0, 1 - impurity=’gini’
針對 Classification 的問題可以選擇 gini, 也可以選擇 entropy 作為誤差值的量測,如果是 Regression 的問題則可以採用 Variance 去量測誤差。
- maxDepth=5
越深的決策樹可以得到比較低的 training error 但是也會比較容易 overfitting。 - maxBins=32
(trainingData, testData) = dataNormalized.randomSplit([0.7, 0.3])
model = DecisionTree.trainClassifier(trainingData, numClasses=2, categoricalFeaturesInfo={}, impurity='gini', maxDepth=5, maxBins=32)

predictions = model.predict(testData.map(lambda x: x.features))
labelsAndPredictions = testData.map(lambda lp: lp.label).zip(predictions)
testErr = labelsAndPredictions.filter(
    lambda lp: lp[0] != lp[1]).count() / float(testData.count())
print('Test Error = ' + str(testErr))
print('Learned classification tree model:')
print(model.toDebugString())
得到以下結果,結果清楚呈現決策樹決策的過程與利用 Testing data 產生的誤差值!
Test Error = 0.19807692307692307
Learned classification tree model:
DecisionTreeModel classifier of depth 5 with 39 nodes
  If (feature 39 <= 0.5)
   If (feature 31 <= 0.5)
    If (feature 38 <= 0.5)
     If (feature 98 <= 0.5)
      If (feature 73 <= 0.5)
       Predict: 0.0
      Else (feature 73 > 0.5)
       Predict: 0.0
     Else (feature 98 > 0.5)
      Predict: 1.0
    Else (feature 38 > 0.5)
     If (feature 81 <= 0.5)
      If (feature 22 <= 0.5)
       Predict: 0.0
      Else (feature 22 > 0.5)
       Predict: 1.0
     Else (feature 81 > 0.5)
      If (feature 71 <= 0.5)
       Predict: 0.0
      Else (feature 71 > 0.5)
       Predict: 1.0
   Else (feature 31 > 0.5)
    Predict: 1.0
  Else (feature 39 > 0.5)
   If (feature 38 <= 0.5)
    If (feature 34 <= 0.5)
     If (feature 8 <= 0.5)
      If (feature 7 <= 0.5)
       Predict: 0.0
      Else (feature 7 > 0.5)
       Predict: 1.0
     Else (feature 8 > 0.5)
      If (feature 46 <= 0.5)
       Predict: 1.0
      Else (feature 46 > 0.5)
       Predict: 0.0
    Else (feature 34 > 0.5)
     If (feature 90 <= 0.5)
      If (feature 73 <= 0.5)
       Predict: 0.0
      Else (feature 73 > 0.5)
       Predict: 0.0
     Else (feature 90 > 0.5)
      Predict: 1.0
   Else (feature 38 > 0.5)
    If (feature 48 <= 0.5)
     If (feature 1 <= 0.5)
      If (feature 62 <= 0.5)
       Predict: 1.0
      Else (feature 62 > 0.5)
       Predict: 1.0
     Else (feature 1 > 0.5)
      If (feature 75 <= 0.5)
       Predict: 1.0
      Else (feature 75 > 0.5)
       Predict: 0.0
    Else (feature 48 > 0.5)
     Predict: 0.0